
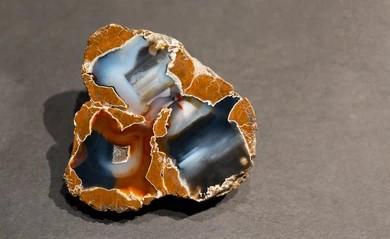
Cutting your thundereggs after collecting them is beyond just using a hammer, or else you destroy the beautiful gems inside. The main goal is to reveal the hidden gems inside, and this requires a saw with a diamond blade and some level of precision to avoid destroying them completely.
In this guide, we will cover the full process of cutting and polishing thundereggs even if you have no prior lapidary experience.
What Tools Do You Need?
Before you start cutting and polishing a thunderegg, you have to gather and arrange the tools. While you might not have access to every needed piece of equipment, there are other alternatives you can explore to ensure a precise and clean cut and polished finish.
Here are the tools you need:
Lapidary Slab Saw

A purpose-built lapidary slab saw is the best tool for cutting thundereggs. It has a stable cutting bed, a reliable coolant system (usually water or oil) that keeps the blade cool and controls dust, and produces a flat, clean cut that requires minimal sanding work afterward.
Blade diameters typically range from 6 inches to 14 inches. For baseball-sized thundereggs, a 10-inch blade is adequate, but a 12-inch or 14-inch blade gives more clearance and is worth having if you plan to cut larger specimens.
Most collectors don't own a lapidary slab saw, and buying one isn't necessary for cutting a handful of thundereggs. Most gem and mineral clubs have slab saws available to members, either for free or for a small per-session fee. If you plan to cut thundereggs regularly, club membership pays for itself quickly in saw access alone.
A Wet Tile Saw With a Lapidary Blade
Alternatively, if you do not have a dedicated lapidary slab saw, a wet tile saw from a hardware store, fitted with a diamond lapidary blade in place of the stock masonry blade, is a workable setup.
If you are going with this, the blade diameter must be at least three times the diameter of your thunderegg, and you must have a reliable method for stabilizing the specimen on the cutting table during the cut. Standard tile saw blades have a slightly wider kerf than dedicated lapidary blades, which means a rougher cut surface and more sanding work afterward, but the finished result is fully acceptable for display purposes.
Note that not all diamond blades are the same. Standard masonry or tile cutting blades are designed for fast, aggressive cutting and will produce excessive chipping on agate and chalcedony. But a lapidary-specific diamond blade, sometimes called a sintered or continuous rim blade, has a finer diamond particle distribution that produces a smoother cut with less blowout at the exit point. These are available from lapidary suppliers online and are the correct blade for any thunderegg cutting, regardless of what saw you're using.
Sandpaper
To finish thundereggs after cutting, you'll need sandpaper in a range of grades for ultrafine smoothing. Two machine setups are commonly used for flat thunderegg faces:
- Horizontal belt sander: This is the preferred method. You can use silicon carbide belts. When using this, hold the thunderegg face against the moving belt, sanding in one consistent direction. Rotate the stone regularly to prevent uneven wear.
- Inverted sanding disk: Works faster but can leave circular sanding marks if your hand movement isn't steady and consistent.
Both methods can produce excellent results when proper technique is applied.
Cerium Oxide
For polishing agate, chalcedony, and jasper, cerium oxide is the preferred compound. Cerium oxide comes as a fine white powder that is mixed with water to create a slurry. This slurry is then applied to a felt wheel, leather pad, or polishing cloth. It is inexpensive, widely available from lapidary suppliers, and consistently delivers excellent results on silica-based minerals. If you do not use cerium oxide, there are other alternatives like Tin oxide, which is a more gentle compound.
Safety Equipment
When cutting, safety is key. These are safety equipment to keep handy before cutting:
- Safety glasses: A safety glass is non-negotiable because when the blade is cutting through the thunderegg, there will be chips and fragments that could get into your eyes. An ANSI-rated pair of safety glasses suitable for side protection is better than regular glasses. Be sure to wear them when cutting.
- A Dust mask or respirator: Wear a dust mask or a respirator rated N95 or higher when sanding, and preferably during dry cutting as well. Thunderegg material, especially agate, chalcedony, and jasper, is crystalline silica. Dry silica dust produced by cutting and sanding is a serious respiratory hazard with cumulative health effects. Wet cutting and wet sanding dramatically reduce airborne dust, which is one of the most important reasons to keep coolant flowing throughout the process.
- Hearing protection: It is important to wear hearing protection if working with a tile saw for extended sessions. Lapidary slab saws are quieter, but tile saws run loudly, and a long cutting and sanding session without protection adds up to hearing loss.
You might also need a piece of wood and epoxy adhesives. This might come in handy if you are cutting, especially if you are a beginner.
Read More: What Are Thundereggs? Formation, Identification, and Where to Find Them
Step-by-Step on how to Cut and Polish a Thunderegg

Here is a step-by-step guide on how to cut and polish a thunderegg.
Orient and Mark the Thunderegg
This step is important because thundereggs form with their heaviest mineral content settling downward under gravity during deposition. The orientation the egg was in when it formed affects what the interior looks like from any given cut angle. If you collected the thunderegg yourself and marked its position in the ground, top, bottom, and the direction it was lying, that information tells you where to cut for the most interesting cross-section.
If you collected it without marking orientation, or if you bought or received it, the best default is to cut through the widest diameter. This maximizes the interior face revealed and gives you the largest display surface on each half.
Clean and Prepare the Specimen
Rinse the thunderegg under water and scrub the exterior with a stiff brush to remove all clay and dirt. Field-collected thundereggs often have compacted clay in every crevice, and loose grit introduced into saw coolant accelerates blade wear significantly. A clean specimen is also easier to mark and handle. Dry the thunderegg completely before mounting.
Mount the Thunderegg for the Cut
Stabilizing the thunderegg before making a cut is an important safety step in the entire cutting process. A round thunderegg sitting unsecured on a saw table has 360 degrees of rolling potential, will shift under cutting pressure, and you get a wandering, angled cut that ruins the specimen.
The standard method is to mount the thunderegg on a piece of scrap wood using two-part epoxy or a strong construction adhesive. Center the thunderegg on the wood, apply adhesive underneath, and allow it to cure fully before cutting. You can leave it overnight if possible. The flat wooden base gives the saw table something stable to ride against and allows you to guide the thunderegg through the blade at a consistent angle.
If your saw has a built-in vise system, use it as it is more secure than adhesive mounting and saves the cleanup step afterward. Position the thunderegg so that your marked cut line aligns precisely with the blade before you begin. Misalignment at this stage means the cut will drift off the equator during the pass, giving you two unequal halves.
Make the Cut
When making the cut, let the saw do the work. Apply light, steady pressure and move the specimen slowly and smoothly through the blade. Do not push harder to try to speed up the cut-up. Extra pressure does not make a diamond blade cut faster; diamond blades cut by abrasion, and additional downward force causes the blade to bind in the cut, builds up heat that damages the diamond segments, and dramatically increases the risk of blowout at the exit point where the blade leaves the stone.
Keep coolant flowing throughout the entire cut. Running a diamond blade dry overheats the bond between the diamond particles and the blade body and permanently damages the blade. If you're using a tile saw and the coolant system is struggling to keep up, pause and add water.
For baseball-sized and larger thundereggs, push the specimen toward the blade steadily, keeping the wooden mount flat on the saw bed throughout. For smaller specimens being cut freehand, many experienced lapidaries prefer to pull the stone toward themselves instead, as it gives better visual control of the cut line.
As the blade approaches the exit point, the last quarter inch of the cut, reduce pressure significantly and slow down. If you're still applying full pressure, the exit edge chips. A slow, light-pressure exit produces a clean edge on both halves. That last quarter inch of the cut determines the quality of the display edge on the finished piece.
A clean cut through a baseball-sized thunderegg will take three to five minutes at the appropriate feed rate, so do not hurry this process.
Separate, Clean, and Inspect
Once the cut is complete, separate the two halves and remove the mounting adhesive. Epoxy dissolves with acetone, soak the wood mount in acetone for fifteen minutes, and it will release cleanly. Scrub off any adhesive residue with a wire brush, then rinse both halves thoroughly.
Wet both cut faces under running water and look at the interior. Water reveals the full color and pattern of the agate or chalcedony in a way that the dry, saw-marked surface does not. The colors will be vivid, the banding clear, and the star-shaped fracture pattern visible at the core if your thunderegg has one.
Read More: Thunderegg or Geode? How to Tell Them Apart
Sand the Cut Face
The cut face from any diamond saw, no matter how good the blade, will have fine saw marks and micro-scratches that need to be worked out before polishing. Sanding removes these progressively, moving from coarse grits that address the saw damage to fine grits that prepare the surface for polish. The standard grit progression for thunderegg material is:
- 60 grit: removes major saw marks and flattens any high spots on the cut face
- 100 grit: removes the scratches left by 60 grit
- 220 grit: refines further, surface begins to look smooth and matte
- 400 grit: final sanding stage before polish, surface should look uniformly fine with no visible scratches
Carefully work through each grit for a fine finish. Hold each half up to a strong light at a low angle after each grit stage and look for any remaining scratches before moving on.
Whenever possible, choose wet sanding. It reduces silica dust and prolongs the life of your sanding media. If you must sand dry, always wear a respirator. The finest silica particles released from agate and chalcedony are invisible to the eye yet pose the greatest risk when inhaled.
Polish the Face
Polishing is a very important stage, as this is where you transform a sanded thunderegg face into the glassy, wet-looking finish that shows the interior patterns at their best. The cerium oxide is the right polishing compound for agate, chalcedony, and jasper.
Apply a small amount of the oxide slurry to your polishing surface, keep it damp throughout, and work the thunderegg face against it with steady, even pressure. Do not let the cerium oxide dry on the surface during polishing; a dry compound scratches rather than polishes. If you are hand polishing, rub the cerium on a polishing cloth. This method works for any size specimen and requires no power tools at all. It takes significantly longer, fifteen to thirty minutes of active polishing for a baseball-sized face, but the result is identical to machine polishing done correctly.
The finished polish should give the surface a consistent, high-gloss finish that looks wet even when completely dry. Hold the polished face under a strong light and look for any remaining dull patches or fine scratches.
For thundereggs with opal interiors, substitute tin oxide or ZAM polishing compound for cerium oxide. Opal has a Mohs hardness of 5.5 to 6.5, significantly softer than agate and chalcedony, and cerium oxide is aggressive enough to scratch it. Tin oxide and ZAM are gentler compounds that produce an excellent finish on opal without risk of damage.
Here is a video you can watch to see how to properly cut thundereggs.
Thunderegg Cutting Done Correctly // Geometric Pressure Ridges
Conclusion
Cutting open a thunderegg is one of the most genuinely satisfying experiences in rockhounding, not because the process is glamorous, but because the gem inside is worth all the stress.
When cutting, take your time with each step. The cutting itself down to sanding and polishing requires precision, and rushing either stage produces a result that doesn't do justice to what's inside. Work through the full grit progression, polish until the surface looks genuinely wet, and the finished piece will reward the patience.
Read More: 6 Best Ways to Open a Geode Without Ruining the Crystals
Frequently Asked Questions
A Dremel is not suitable for the initial cut through a whole thunderegg, the cutting discs are too small and fragile to handle the sustained cutting pressure required. An angle grinder with a diamond blade can make the cut, but it is significantly more dangerous than a table-mounted saw, produces a rougher cut, and requires considerable experience to control safely. Use a table-mounted saw, borrowed from a lapidary club if necessary.
For a baseball-sized thunderegg, expect the cut itself to take five to ten minutes, including setup. Sanding through the full grit progression takes thirty to sixty minutes, depending on your equipment and the roughness of the initial cut. Polishing takes fifteen to thirty minutes. Total hands-on time for a finished display piece from a raw specimen is roughly one to two hours, more for your first few attempts, less as you develop technique.
No, and the difference matters. Geodes are hollow, which means the saw exits into space partway through the cut. This requires extra care at the exit point to avoid cracking the crystal-lined walls. Thundereggs are solid throughout, which means consistent cutting resistance all the way through. Thundereggs are generally easier to cut cleanly than hollow geodes for this reason, but they require more sanding afterward because the solid agate interior needs to be worked to a higher finish than a crystal-lined geode wall.